The Camcorder
Introduction
The camcorder is a video camera and a video recorder (VCR) in one. It has
three major components: the image sensor, the lens system and the recording
part.
The Image Sensor
Before the camcorder all cameras were installed with a special camera tube,
such as the Vidicon, the Saticon and the Newvicon. This meant they were big and
heavy and consumed a lot of power. They could not cope with intense light
sources as these caused 'streaks' on the image. Glaring lights or clearly lit
objects became part of the image, and remained there into the next shot.
Charge-Coupled Device (CCD)
In the modern camcorder the tube has
been replaced by a special chip; a semiconductor image sensor. This image
sensor is called a CCD (Charge-Coupled Device). The CCD chip is a round plate
of about 1/2" or 2/3" diameter in small camcorders. The CCD image sensor is
made up of between 320,000 microscopically small light-sensitive elements in
standard camcorders and 500,000 in high-end and professional camcorders. These
elements are placed on a surface of no more than one square centimeter. The
image for recording is projected via the lens on the CCD chip, then converted
to an electric signal, which is the video signal. The image projected on the
CCD chip charges the cells electrically. The brighter the incoming light, the
more powerful the charge which is how a charge image is created. This charge
image is then converted into an electric current or signal which corresponds
to the light and color information.
To gain a better understanding of this process, we will now have a look at
the process in the old camera tube. In this tube, the conversion takes place
by means of a fast-moving electron beam which scans the entire image field of
each cell (in the same way as a TV tube). In the camera tube the electron beam
picks up only as many electrons for each cell as it needs to neutralize the
charge caused by the light. In this way the original constant electron power
changes into a current that varies accurately along with the information on
the photo conductive coating. Thus, a video signal is generated.
For CCD chips, this process is a little different. Instead of a flashing
electron beam, the process takes place via a second coating. Every 1/50th of a
second the complete charge image is transferred to the second layer in an
instant. Meanwhile, in the next 1/50th of a second the next image is built up
in the charge carriers, the cells of the second field transmit their charges
one by one, resulting in a continuous electric current. Power and current
direction correspond accurately to the charge, and thus the light information
generating a video signal. The video signal consists of black and white and
color information (Y and C signal). The black and white information (luminance
signal Y), consists of the three primary colors: 30% red, 59% green and 11%
blue. (For more information see Chapter 2: the TV Set.)
In professional tube cameras these colors are generated via prism systems,
after which three camera tubes or recording elements take care of the rest of
the processing steps. In standard camcorders only one recording element is
used which is the CCD chip. Color filters are installed in front of the CCD
chip, which separate the image into the three primary colors. A complicated
matrix circuit generates two color-difference signals from the three primary
colors, which are ultimately interwoven with the black and white information
into the final video signal. To achieve better color reproduction, some
professional camcorders have three CCDs, one for each primary color.
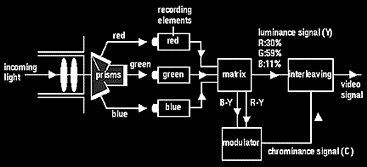
Color separation in professional cameras.
The main advantages of the CCD image sensor is that it keeps the camcorder
light and small. The CCD consumes only little power, is always ready to use
and offers excellent image quality. The picture sharpness is high, giving good
color images on conventional TVs. It is also more shock resistant than a
camera tube, and so CCD cameras can stand rough handling. CCD image sensors
have a high light sensitivity: they offer good image quality at a light power
of 10 to 15 Lux, which equals light that is emitted by a single candle at a
distance of 20 centimeters. An additional advantage of the CCD chip is that it
is not sensitive to streaks, blurring or burning. A CCD camera can be directed
towards a heavy light source, such as the sun, without burning spots,
comet-like streaks or color stains on the images.
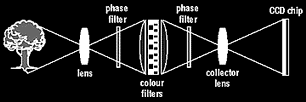
Color separation by means of a color filter as used in camcorders.
The Lens
The CCD chip is the heart of the camera, but the lens is the key to the
performance of the camcorder. The quality and price of a camcorder are largely
determined by the quality and characteristics of the lens. Lens-related subjects
which are covered here are diaphragm, focal distance, lens types, depth-of-field
and autofocus.
Diaphragm
As in a photo camera, the lens of a videocamera is provided with a
diaphragm control which regulates the amount of light to go through the lens
by adjusting the lens opening. In a way, it works in the same way as the pupil
in the human eye. If too much light comes through the lens, a picture will be
overexposed. When too little light comes through, a picture becomes
underexposed and therefore too dark. For example, if one makes a video
outdoors in the bright sunlight, there is so much light that it does not
require the whole lens to be open. The lens opening can be adjusted, so that
less light comes through. In the opposite case, for example, indoors on a
gloomy day, the incoming light can be increased by opening the lens wider.
The diaphragm can be adjusted in different 'steps' or 'stops'. These steps
in lens opening are called the diaphragm values standardized internationally
as follows:
1 - 1.4 - 2 - 2.8 - 4 - 5.6 - 8 - 11 - 16 - 22
The diaphragm values represent the ratio between the diameter of the lens
and the focal distance. The higher the diaphragm value, the smaller the lens
opening. With diaphragm value 1 the lens is completely open. With value 22 the
lens is almost closed. Every next number is 2 times larger than the previous
number, causing every higher or lower step to have a light absorption that is
precisely twice as small or big. In photo cameras these diaphragm values are
usually indicated on the lens, but this is not the case on videocameras. This
is because a videocamera is provided with an automatic diaphragm controller,
something which in practice is not only a welcome tool, but may even be
considered to be a prerequisite for trouble-free video recording in changing
light conditions. In many cases the automatic controller can be switched off,
by pressing the button IRIS.

In camcorders, the diaphragm automatically adjusts itself to the light
situation. Left: open diaphragm (value 1). Right: almost closed diaphragm
(value 22).
Backlight Compensation
Being able to switch off the automatic
diaphragm controller can be of use in case of backlight recordings, which,
with normal diaphragm would be too dark and non-transparent. In this case
the lens needs to be opened one step further, so that more light shines on
the recording element. To facilitate this backlight compensation many
camcorders are provided with a special button for backlight correction (Back
Light).
Sometimes a negative rather than a positive correction is required, for
example when filming through a small gate. Without correction the gate would
be recorded with all its details, whereas the view behind it, which you really
wanted to record, would be overexposed. In this case the diaphragm needs to be
reduced one stop. This form of backlight compensation is called High Light
correction.
A manual diaphragm has great value if you want to fade in and out at the
beginning and ending of a recording. In the opening shots the image will grow
out of the dark and at the end it will disappear in the dark again, to give a
professional impression. Some camcorders have a special FADER feature that
automatically fades in and out in this way.
Focal Distance
Every lens has a focal distance (f). It is the point at which light beams
emitted by the lens come together and project a clear image on the image
sensor. The focal distance is always mentioned on the lens, e.g., f = 50 mm.
The larger the focal distance, the larger the images will be displayed. In a
videocamera we talk of much smaller images (1/2" or 2/3"), than in the early
plate cameras. As a result, videocameras have a relatively small focal
distance, something like 9 to 12 mm, whereas the early 9x12 cm plate camera
had a standard focal distance of 12 cm (120 mm), the 6x6-camera 75 mm and the
miniature camera 50 mm.
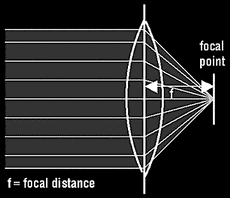
Focal distance is the distance between the lens and the focal
point.
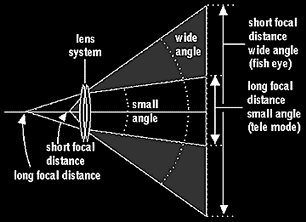
Showing the relationship between focal distance and image angle. The
smaller an image angle, the longer the focal distance.
Lens Types
The Telephoto Lens
A normal focal distance is approximately
equal to the diagonal of the projection field. This projection field is in a
photo camera the negative and in a camcorder the CCD-chip. By taking a lens
with more focal distance than the diagonal of the projection field, the same
field will contain a smaller part of the image. This is what a telephoto
lens does: it decreases the image angle. The effect on the image is that it
seems as if faraway objects get closer, but simultaneously you get the
impression that everything is compressed and the perspective fades away.
Wide-angle Lens
By using a lens with a shorter focal distance,
much more is displayed on the image field. The image angle gets bigger, as
we work with a wide-angle lens. When the angle is extremely wide, say 180
degrees, we call it a fish-eye objective, which leads to a typical circular
image.
To be able to work with lenses with various focal distances, some
camcorders are provided with a so-called C-Mount-vatting (24.4 mm diameter - a
common feature on photo cameras) that allows you to change lenses on your
camera. Most camcorders, however, are equipped with a zoom lens.
The Zoom Lens
The zoom lens is a lens that allows you to change
the focal distance of the lens. This type of lens is installed in almost all
camcorders. The zoom lens is a simple way to go from tele-(far) to
wide-angle (close-up to macro), making use of all the stops. This can be
done manually via a handle or with a built-in electrical motor (motor zoom).
There are zoom lenses with a range of 6x, 8x, 12x, but sometimes they do not
go any further than 3x.
The zoom range is determined by the ratio between the two outermost focal
distances. If they are, for example, 9 and 54 mm, then the zoom range is 6x.
If they are 12 and 36 mm, then the range is 3x. This last one is rather
limited to be of use in practice. Basically, a zoom range of 6x is the
lowest useful zoom, whilst a 12x range only makes sense if you attach a very
stable stand to shoot rock-solid pictures in tele mode. Applying a good
stand when filming is always advisable, but when using 12x zoom-in it is a
necessity. Practically all zoom lenses have a special macro mode. To use it,
the object you want to film needs to be very close (at a distance of 5 cm of
the lens) to be recorded sharply. This feature enables you to make
screen-wide recordings of very small objects such as stamps, or insects.
Depth-of-field
The diaphragm does not only determine the amount of light that is absorbed,
but also the amount of depth-of-field. If the lens is fully opened, only the
object on which the camera is focused is reproduced sharply. The more the
diaphragm is opened, the more depth-of-field extends forward and backward.
This means that in the case there is little light, and the lens is wide open,
only limited depth-of-field can be expected. Depth-of-field should not be
confused with sharpness! An image is always sharp (if you have focused
accurately on the object), whether or not there is acceptable depth-of-field.
In case of extended depth-of-field, there is increasing sharpness from the
front areas to the back areas. The center of sharpness, i.e., the focus, is
not situated precisely in the middle of the sharpness area. It is situated at
1/3 of the front sharpness border. As a result it is much more difficult to
get greater depth-of-field in recordings of close situations than of faraway
objects. Therefore, the closer the recording, the more accurately one needs to
focus.
Depth-of-field is also related to the focal distance. The longer the focal
distance, the smaller the depth-of-field and vice versa. (In other words, the
wider the image angle, the greater the depth-of-field). In the telephoto mode
the depth-of-field is smallest and must therefore be focused most accurately.
Because depth-of-field increases when shifting towards wide-angle, the image
will remain sharp during the whole process. Only in the outermost wide-angle
situation might it be necessary to do some adjusting, but this has to do with
lens quality rather than the focusing.
In summary, the greatest depth-of-field occurs at wide-angle and a small
lens opening.
Autofocus
Every camcorder features automatic focusing, or autofocus. Autofocus works
almost like the human eye, but not as fast, although some advanced systems can
almost compete. How does autofocus work? How can a lens determine what to
focus on? Not only is it necessary to precisely measure the distance to the
main object, but it also needs to determine what the main object is. Then,
information needs to be transferred instantaneously to a motor which needs to
bring the lens into the correct position just as fast. To achieve this, there
are two basic systems, active and passive.
Active Autofocus Systems
Active systems are called active
because they send out a signal in order to measure on what to focus. Until
recently, many camcorders came with some sort of infrared (IR) autofocus
system, and (less applied) an ultrasonic system. Both systems use the
principle of sending out signals in pulses. These signal are reflected back
by objects and registered by the receiver. Then, the time difference is
measured between the outgoing and incoming signal, which allows the system
to calculate the precise distance. It is a kind of radar system and as far
as the ultrasonic system is concerned, it is the same principle that is used
by bats. Because sound waves travel slower than infrared light waves, this
means that the ultrasonic system functions slightly slower than the infrared
system.
Infrared system with time measurement. The time difference
between the outgoing and incoming beam determines the distance. IR measuring
is not influenced by windows, but sometimes it is by shiny and dim spots and
other IR sources.
The advantage of the IR autofocus is that it can also be used when there
is little light or no light at all and that it is rather fast. But there are
some disadvantages. The IR autofocus system is sensitive to infrared light,
so also to other sources that emit infrared light, such as open (camp)
fires. infrared light simply goes through glass. This might be welcome if
you want to film through glass, but a shiny part of the window can reflect
the IR beam, so that it will focus on the window. The IR beam could be
absorbed by black dim surfaces, causing the lens to be set automatically to
infinity. When the distance is calculated, the lens is adjusted to the right
position by the lens motor.
Passive Autofocus Systems
All camcorders currently manufactured
have some sort of passive autofocus system which has replaced the infrared
and ultrasonic systems. These camcorders do not transmit any light or sound
themselves, but only react to incoming light. The basic principle is that
the CCD image sensor will try to create an image as sharp as possible.
Because the sharpest image possible requires the highest possible frequency,
the system tries to find the highest frequency. Either the lens or the CCD
chip moves swiftly back and forth to find out at what position it can
register the highest possible frequency.
But how does an autofocus system determine at what point to focus? In
general it will take the object that is situated in or near the center of the
image field. In active systems this is realized by focusing the light or sound
beam as sharply as possible, and in the case of passive systems, to focus the
receiving optics as accurately as possible. In case of doubt, for example when
two adjacent objects are near the image center, the autofocus will always take
the nearest object. If the video film maker wants to choose the other object,
he or she can always switch off the autofocus and focus manually.
Recording Part
The recording part of a camcorder works basically in the same way as the
recording/playing part of the VCR. The main difference lies in the fact that a
camcorder has smaller components and double the number of heads. For further
information on how the recording part works, see Chapter 3: the Video Recorder.
At present, there are five types of camcorders that use different recording
systems and a sixth one will be coming soon.
Camcorder Types
Currently, there are five non-compatible camcorder types that use different
recording systems. They are divided into two families: VHS and 8 mm.
VHS Movie
The VHS movie or VHS camcorder is designed to be used
with standard VHS-cassettes, and therefore is part of the large-sized
camcorder category. This camcorder allows for the longest playing times, up
to four hours when applying the E-240 cassette, although shorter tapes
(E-180, E-120, or E-60) might turn out to be more practical. Including the
battery and the cassette, the weight of this type of camcorder is over two
kilos.
Smaller camcorders weigh much less, something like 1 to 1.5 kilos, but
lighter is not always better. It is much more difficult to make stable
recordings with a small, light camcorder, than with a heavier type that is
carried on your shoulder. However, if you want to take your camcorder along on
a trip, a small, lighter device is easier to transport. As a normal VHS
cassette is used, the recordings can be played back immediately via any VHS
recorder. Due to their size and weight, VHS movie camcorders are hardly used
amongst consumers in Europe anymore.
VHS-C
To be able to use smaller cameras and still apply the
world's most used recording system, a smaller VHS-version was designed:
VHS-Compact (VHS-C). The width of the videotape remained the same (1/2" or
12.5 mm), as did the tape speed and the tape recording speed: only the size
of the cassette became smaller. As a result a VHS-C tape can be played back
in any conventional VHS-VCR, using a special adapter. There are also video
recorders with a compatible loading system in which both cassette types, VHS
and VHS-C, can be applied without having to use adapters. As the cassette is
much smaller and the tape much shorter, the maximum playing time is 45
minutes in SP-mode (Standard Play). It is also possible to record at half
the speed (LP - Long Play, or EP - Extended Play), making the maximum
playing time 60 minutes. However, this can only be done at the expense of
image and sound quality.
Super-VHS(C)
The Super-VHS(C) system is an improved VHS-C
system. As the resolution now is 400 lines, compared to 240 lines for the
VHS and VHS-C systems, the image is much more detailed. It is now possible
to edit and copy tapes without visible quality loss. Only after copying from
a second copy recorded tape, do slight quality reductions become noticeable.
A disadvantage of this system is that it cannot be played back via
conventional VHS recorders. It is only possible to play back via S-VHS
domestic recorders, using a VHS-C adapter. If there is no S-VHS domestic
recorder available, S-VHS(C) tapes can only be played back via your
camcorder or copied on VHS cassette, which means loss of the high quality.
S-VHS(C) camcorders produce high quality recordings, especially the hi-fi
stereo sound versions.
Video-8/8 mm
Video-8 is a completely different system which
uses an 8 mm videotape. The small tape is considered to be a prerequisite to
achieve a truly small and handy product. Although 8 mm tapes cannot be
played back on a VHS-VCR, they can be copied to VHS and S-VHS format tapes.
The Video-8 system, which was developed specifically for portability
purposes, offers better image and sound quality than the VHS-C system. The
Video-8 tape also has longer playing times than the VHS-C tapes, 90 minutes
compared to 45 minutes (VHS-C). In LP mode, it even offers 180 minutes,
although a loss of quality results.
Hi8
Just as the Super-VHS(C) system is an improvement on VHS-C,
Hi8 is an improvement on the Video-8 system. As in the Super-VHS system, all
improvements relate to increased bandwidth and better separation of color
and brightness signals, Hi8 goes further by applying a specially developed
Metal Evaporated (Metal-E) tape, ensuring that the image quality is even
better than in Super-VHS(C). However, Hi8 recordings cannot be played back
via standard Video-8 equipment.
DVC - Digital Videocassette
A digital videocassette standard
is, at the time of writing, being developed and to be introduced as a new
standard for home video. The tape size will be small, and the system will
have the quality features of digital recording: high quality performance in
sound and image.
Sound Recording - The Camera Microphone
All camcorders come with a built-in microphone, to allow you to record the
sound together with the image recording. As a result, sound and image are
perfectly synchronized. The built-in microphone is usually surround sensitive
and records surrounding sounds, which sometimes results in the recording of
unwanted disturbance. A separate direction-sensitive microphone can be used to
avoid this from happening. Sometimes this comes as a built-on microphone, but
in most cases there is a microphone socket available to use for an additional
microphone. A telescopic microphone is a microphone that can be enlarged
enabling the microphone element to get closer to the source. Even though such
a microphone leads to better results than the conventional built-in
microphones, it is far from perfect. Recording images and sounds are two
different things. Filming usually does not take place too close to the object,
whereas the microphone needs to be positioned as near to the source as
possible. Consequently, professional video making always requires (especially
when you are, for example, interviewing people) a separate microphone. It is
for this reason that the camcorder is provided with a separate microphone
connection. This can be used to either plug in the built-on microphone or
separate microphone with connection cord. This cord should not be too long, as
it will cause loss of quality and additional humming and noises. To be able to
hear what is recorded, the camera is supplied with a separate ear telephone
connection.
Other Features
Camcorders come with a wide range of extra features to make filming easier,
better and more creative. As the list would be almost unending, only the more
common features are described here in alphabetical order:
Audio Dubbing
Audio dubbing makes it possible to add sound
afterwards to any recording, without affecting the original image. This takes
away the worries of recording in places with a lot of noise or any unwanted
noises occurring during recording. After the image recording you can make the
sound recording. Only the special soundtrack (mono) on the tape can be used
for dubbing and not a hi-fi recording. The mono track is also present on hi-fi
tapes.
Electronic Sensitivity Control
An electronic sensitivity control
makes it possible to film even when there is hardly any light. However, when
there is only little light, the resulting color quality will not be optimal.
Besides standard High and Low modes, this sensitivity control often features
automatic control, which is comparable to automatic diaphragm control.
High Speed Shutter
The High Speed Shutter enables the film maker
to make recordings at much shorter intervals, e.g., 1/1000 second compared to
a conventional 1/50 second. Thus, objects that move at high speeds can be
frozen on a still picture. When played back with the still playback option,
the image will be very sharp, without the usual blurred side effects. As a
result of short scan times, the image will only become jumpy when played back
in normal mode. As in conventional photography, short scan times require much
light. In many cases the available light will turn out to be insufficient.
Nevertheless, there are camcorders available with a wide range of short
shutter times, from 1/150 to 1/10,000 second.
Insert
The Insert feature allows you to insert additional images
in an existing recording. Thanks to the so-called flying erase head, it is
possible to add some variation to a long-winded scene. Some frames will be
lost to allow this insertion, because for every new recording the tape is
rewound just a little bit and erased over that same area. In order to ensure
the relevant images are not lost, one should continue recording for a couple
of seconds when making the original film.
Record Review
By pressing a button the recorder part plays back
the last couple of recorded images via the viewfinder, after which the camera
is automatically switched to record pause. The next recording will then follow
on seamlessly.
Stand-By Switch
The stand-by switch saves a lot of power. In
stand-by mode it is not possible to film, as the viewfinder does not function.
However, the tape is in place, the camera is ready to start and one press of
the button will activate the camera.
Steady Shot
As camcorders have become smaller and lighter in
weight, it has become more difficult to shoot a steady picture. Steady Shot is
a feature that allows you to make recordings which result in a more steady
picture. Optical Steady Shot works on the principle of counter movement of the
camera optics to the camera itself. Electronic Steady Shot works on the
principle of extra field on the CCD chip for vertical corrections, and a
special memory module for horizontal correction.
Viewfinder
As one would like to see what is being recorded, every
camcorder comes with a viewfinder. Most commonly used is the electronic
viewfinder. This is a complete, small image monitor, a mini-black and white or
color tube/LCD screen, with a screen diameter of approximately 2 cm. The
viewfinder also gives information, via LEDs or in digital figures, on start
and stop, under- and over-exposure, white balance, battery status, recording
duration, recording time and date, and sometimes on titles that can be entered
and recorded on tape. Immediately after the recording session the viewfinder
can be used as a monitor to display what is recorded. Sometimes the viewfinder
can be removed from the camera. In that case the recordings can be watched via
an extension cord. Often there is a an eyecup attached to the viewfinder and
for film makers that wear glasses there is a dioptrical eye adjustment
(Eyepiece Corrector Control). Another way to see recordings is via the TV set,
which then serves as a monitor.
The viewfinder with on-screen information.
© EXIL SERVICE 1992-2017
N.Bgd, Bul
Z.Djindjica 84, Blok 30 • E-Mail:
tvlcdservis@gmail.com •
Tel/fax: (011) 3115-135
w w w . s e r v i c e . r s
www.service.rs
www.service.co.rs
www.service.in.rs
tv servis popravka
televizora dvd servis lcd servis servisiranje televizora lcd plazma popravka
monitora
industriska elektronika popravka dvr digitalni videorekorderi servisiranje
monitora